Lake Tahoe Launch … Messy and Worth It – The Short Version

So after last week’s debacle … we learned to be patient and wait for better wind conditions. Here’s the short version of what happened. We inflated on the beach at DL Bliss State Park:


Paddle boarded the balloon out where the clear water of Lake Tahoe was about 45 feet deep:


With a snorkeler for help (he also shot some great video with a GoPro I’ll share another time):


Next we launched with 2 GoPro cameras 40 feet deep in the lake at the end of a line and 4 more on other payloads:


Here are some of the views we got:

For size reference: Lake Tahoe is almost 22 miles long and a bit more than 11 miles wide. (35 km long X 19 km wide). The lake is 1645 feet deep (501 meters).

Lake Tahoe, Carson City, Nevada, Reno and Pyramid Lake from 90,000 feet + (near space)


Then the balloon burst somewhere between 95,000 and 100,000 feet – follow the link to see the frame by frame of the burst:

https://www.flickr.com/photos/101610181@N02/sets/72157644958349838/

And the video:


Then it landed and we went and got it:

There was some animal byproduct to deal with:

It was a great day!

Here is a link to more photos.

NOTE: This launch was part of a project being developed by the University of Nevada, Reno- Mechanical Engineering Department, the 21st Century Division of the Washoe County School District, and Nevada’s Northwest Regional Professional Development Program (who I work for now). We were trying out some technologies and possible engineering and science problems to turn over to area K-12 students to solve for a similar launch next April or May – still in the planning stages.

Learning is messy!

Messy Balloon Launch – Failure is a Teacher

I’ve been “Tweeting” out from time to time lately about our latest “High Hopes” balloon launch. This balloon launch is different from launches we’ve done in the past in that students are not directly involved … but this flight is really all about getting students to be involved.

Lake Tahoe From Near Space during a previous flight (blue object in upper corner is a party balloon attached to the payload)

IMG_4969


We have big plans for a project next year that will involve students, but we need to try out a few new twists and some new technology and that is complicated. In addition, one of our ulterior motives is to try things that won’t necessarily work or go well …  and so we’ll turn our ideas, results, and  problems over to students for them to engineer and re-engineer. It’s all part of that engineering design process.

In fact, some of what we are attempting is so complicated we experienced a failed launch yesterday. Part of the failure was trying to figure out the procedures required to launch a balloon from and in the water. This involves having divers in the water and has not been tried before so we were working it out. Our failure mostly resulted however, from trying to launch when the wind was just too gusty and unpredictable. Here is the video of the second balloon that popped on the ground:

This video was actually shot by a camera that was laying on its side waiting to be dropped into the lake … I rotated the image so it is easier to watch. The balloon is blown right into the kayak paddle … and that was that. We are monitoring the wind and will make a new attempt to launch next week when all members of the team have time and it isn’t a windy day … AT ALL … so watch for the results … if things go as planned we should get back some great photos and videos.

A more important reason for this post however is that if school was still in session I would be sharing this story with students and teachers … and I plan to in the future. I would also share this video of a NASA balloon launch gone astray that almost killed people and caused millions of dollars in damage. I have shown this commercial of Michael Jordan explaining the power of failure as well. (How many examples can you think of right now to add here? I bet a bunch.)

Students have to understand that adults and even “experts” have things, “not go as planned,” and that how we process and handle that is vital. This is the crux of “messy learning.” That the process should not purposely involve careless, especially dangerous mistakes born of disregard, but that analyzing and learning from mistakes is how learning evolves. We should be teaching this through the experiences happening in and out of our classrooms.

That takes time … learning and doing  that are important involve dealing with complexity and the complications that can only be realized by attempting complicated things. That kind of learning and doing can’t always be put on a tight schedule, nor should it. It also can’t always be planned or experienced the same across 2 or more classrooms on the same grade level when teachers are meeting in PLCs. Complexity and learning happen beyond what we can plan and we must embrace that more in our schools. To be fair I think most believe that, where we fall down is in not REALLY embracing it and allowing it to happen … even sometimes.

This messy learning is a big part of what STEM is about. Beyond the learning being messy, the planning, administration, scheduling and implementation are messy as well. And somehow it has to be OK that they are messy.

Sharing our failures and our thinking, planning and implementation after failure is one important aspect we don’t often give the respect it deserves in our schools.

Learning is messy!

Story of a 3D Printed Whistle

Pavel Solin is an associate professor in the Applied Mathematics Department at the University of Nevada, Reno, and the founder of NCLab, an open public cloud computing platform that provides free web browser access to open source software related to computer modeling and scientific computing. I teamed up with him earlier this year to teach a coding class for teachers ….  well he taught it, I set the class up and took attendance basically.

Pavel contacted me this week with a story about elementary students engineering a whistle that might actually work – I’ve cut and pasted his blog post about it below. I am adding video clips of trying the printed out designs. One aspect that amazes me is that the printer prints out the ball inside the whistle … inside the whistle!

I’ve seen many examples of figures printed out on a 3D printer … and they are impressive. Students have to figure out and problem solve coding the design to get it just right. But this is different in that students aren’t just printing out a figure that looks like a whistle, they are using the engineering design process to make a whistle that actually works … hopefully.

Understand that in this instance students were scaffolded along the way by their teacher. I was thrilled when Pavel gave me the 3 whistles to use as examples. I’m really looking forward to trying projects like this once the 3D printer I am building from a kit is finished (2 days from now is the goal!).

 Pavel’s post with my addition of video clips:

Story of a Whistle

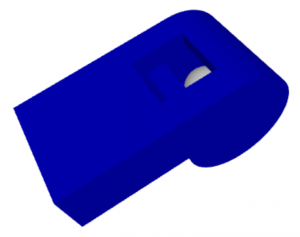
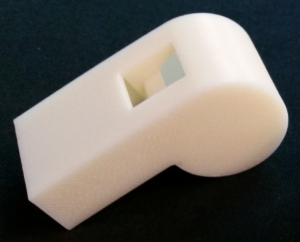
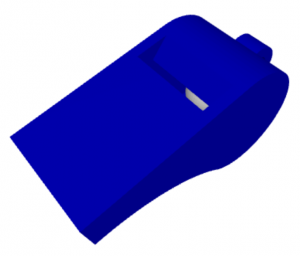
Few days ago, kids from the Schurz Elementary School in Mineral County School District, supervised by Jeremy Elsmore, designed a whistle. I was amazed by the idea of creating something that works. So far, all 3D models I saw were just for display. Here it is. The ball inside the chamber is cool. Once printed, it will remain trapped there forever.
01a

Naturally, the students were anxious to see whether the 3D print would produce sound. Me too.
01b

Click the video link below to see if this whistle design works!


But unfortunately, it did not. The symmetry cutplane reveals that all the air blown into the whistle leaves through the large opening before entering the chamber, and even before hitting the opposite edge.


01c

Second Design

Kids sometimes tend to give up when something does not work. This example can be used to show them that when something does not work, that’s not the end at all. On the contrary – it’s the beginning. To force the air into the chamber, the design was changed:
02a

To better see how the whistle is arranged inside, here is the symmetry cutplane again:
02c

And, this is the 3D print:
02b

Click the video link below to see if the second “re-engineered” design works.


Nice, right? Do you think that it worked? Nope. Argh!


Third Design

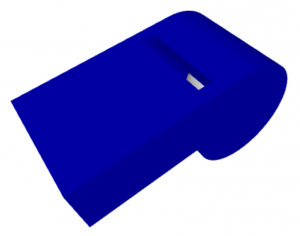
The whistle is not a simple thing at all. We googled for schematics of whistles but those we found were not very useful. We also watched several YouTube videos showing how to create a whistle. But all of them were using a different design, without the ball and chamber, based just on a short straight piece of wood. Nevertheless, in all of them, the edge that is hit by the streaming air was sharp. That’s what we did in the third design:
03a

Again, here is the symmetry cutplane that reveals the internals:
03c

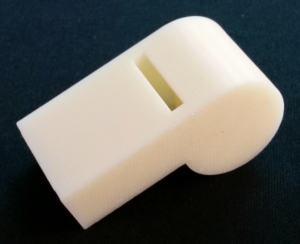
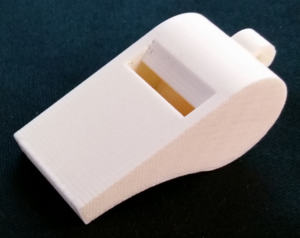
And finally, this is the 3D print:
03b

Will the third try be the charm? Click the video to find out:


So what else could be designed and printed that actually is a working product? I already thought up designing a whirlybird design that flies on its own. What else?


Learning is messy!

A Quick Point About STEM

I’ll be heading out this Tuesday to New Orleans for the NSTA STEM Forum. On Thursday I’ll be presenting: “STEM What Does That Really Look Like In A Classroom.” It’s a presentation I’ve done a number of times in various versions.

Basically I share examples right out of my classroom (and other teacher’s classrooms my students and I have collaborated with over the years). A major point I make is that STEM is language intense and a very powerful language arts intervention (You’ll have to see my presentation to learn how). A truly integrated STEM approach should make connections in every subject, and that is why I promote STEM as a broad, rich, inclusive curriculum. Note that I also mention that I don’t care if we call it STEM … to me anything that brings back a broad, rich, inclusive curriculum after so many years of a narrowed to very narrowed curriculum is OK with me.

Many of the schools I serve, especially the schools that have recently become STEM schools or academies , have also been schools that have experienced the most narrowing of their curriculum. STEM gives them “permission” to bring those subjects back, a big part of my job is facilitating them in doing so.

However, I’ve had conversations with teachers and parents that have had negative experiences with STEM. They explain that when STEM learning was introduced at their site that the arts and other subjects were virtually removed from the curriculum and the STEM subjects were given all the focus (science, technology, engineering and math).  In general this approach misses the point of STEM learning. I point to Leonardo da Vinci as one example of a STEM scholar. He integrated the STEM subjects with the arts, including music. A truly integrated approach that emphasizes the connections between subjects and fields of study should be the goal of a STEM program.

Any thoughts?

Learning is messy!


Even Saturday Afternoon We Are 3D Printer Building

Yes, we we’re back at it today. Not everyone could make it, but there we’re 14 –  3D printers under construction today. A few folks even finished and got theirs printing. Some of us have missed possible work days so we are a bit behind, and next week I’m off to New Orleans for the NSTA STEM Forum and then my daughter’s graduation from the University of Nevada, Las Vegas, so I’ll miss the next 2 work days.

IMG_1942


Today featured lots of soldering:

IMG_1940


And attaching pieces with allen wrenches and lock nuts:

IMG_1943


Ironically, some of the parts we installed today we’re printed on a 3D printer – I placed the pliers in the shot for scale:

IMG_1947


Which when assembled and attached to a motor became a new part:

IMG_1949


Our progress today:

IMG_1948


IMG_1950


IMG_1951


Lots of messy learning today … had to drill out a piece made from aluminum that was not quite big enough to accept a heater core … I can’t show pictures of how we did it … not a good example for safety, holding a piece in my hand while using a high speed hand drill to bore it out – took a half hour at least. A few parts that had to be uninstalled and then reinstalled to get everything to fit just right slowed things down as well.

More in a week or so.

Learning is messy!

What Better Way to Spend A Friday Evening? – 3D Printer Building

Last week I missed the Saturday class and 4 hours of time to work on my 3D printer. Fortunately they offered some extra time Friday night to work. So about 6 of us showed up and spent 3 to 4 hours.

IMG_1926


This all takes place in the University of Nevada, Reno, Engineering Design Lab.


Doug Taylor and I spread out all the parts from our 2 printers – still lots to assemble.

IMG_1927


IMG_1930


Slowly but surely the printers take shape.

As usual the laser cut wood that makes up the bulk of the pieces reeks of burned wood.

IMG_1931


I add 2 more motors, (out of 5 total)  several belts and rollers that snap into their tracks and then make sure each part moves smoothly and easily. And when they don’t, adjustments are made and parts are taken apart and put back together correctly a few times (messy learning for sure).

IMG_1932


The screen is attached and it starts to look more like a 3D printer.

IMG_1933


IMG_1934


This is where I ran out of time today, but back at it tomorrow. Lots of parts left to go, and based on others that are farther along … “lots of soldering … lots and lots of soldering.”


IMG_1936

The prototype was running again today … mocking us it seemed. We’ll get there. 🙂

The prototype of our printer showing off.

The view from the back:

Learning is messy!

Update: Rethinking School District Social Media Policies for Teachers / Students

One of the challenges of my job as STEM Learning facilitator for 6 counties, has been that some of those counties (school districts here are by county, so every county is it’s own school district) have very restrictive online access policies … meaning they block almost anything even remotely social – blogs, wikis, photo archiving sites like Flickr and more. In one school district I was working with a group of teachers and pointed out that I’d found one of the above “not-blocked” – my mere mention of the fact was met with “SHHHH!” and,  “Don’t tell anyone! If they know its open they’ll block it!” But when I asked if that meant someone was using it they admitted that no they weren’t – for various reasons … none of them about educating children.

DSC00001.JPG

I just want to point out that the “T” in STEM stands for technology, and the real power of that technology is learning to learn, sharing learning, collaboration and more. The standards even demand that students collaborate globally, and as I point out often, I don’t think they mean by sending letters back and forth.

Back in November I wrote a post about this issue and asked for feedback on:  “What would be the most useful thing we could do to encourage district leaders to rethink their social media policies for teachers/students?” I received some great feedback in the comments section from some really smart people – check them out in the comments on that post. During a Twitter chat I even got a response from Arne Duncan, the US Secretary of Education asking for the names of the districts that blocked these sites. Although I did collaborate with folks from the USDOE after that, it was agreed that having Secretary Duncan contact these school districts directly was probably not the best course of action.

Instead we ramped up our campaign of information – both gathering information about what led the opposition to access, and disseminating information about safety and the reality of the various laws on internet and information use and access that many were misinterpreting to mean if they gave access to anything social on the internet they’d lose their e-rate funding.

In December I was invited to present to one district’s EdTech committee. I used a 2-pronged approach. I showed them numerous examples of the powerful use of these technologies and applications as learning places. Collaborative projects, how blogging can be used to motivate writing, editing, communicating, collaborating and more – wikis, video-conferencing, Google Docs and more – I have many examples right from my own classroom, but also with the many teachers and students my classes collaborated with over the years.

Next I pointed out the realities from laws designed to keep students safe online (the ones that lead folks to believe they’ll lose their e-rate funding and be sued). I was able to use numerous sources to point out that the law, in a nutshell, states that you must basically show that you are trying hard to keep students safe, if something then goes wrong you are OK (slightly more complicated than that).

The good news is, that that school district has “green lighted” a pilot program of blogging in one of their elementary schools with 4th graders. Tomorrow I meet with the teachers at the school to get their blogs set up and a bit of training … then Tuesday I’m back all day to get each class started to blog and post a few times to get the process down as a first step. I noted last week while visiting the school that wikis are now unblocked and even Flickr (but almost no one uses them yet or even realizes that they are unblocked), so we have a foot in the door!

I’m not nervous at all to work with the teachers tomorrow, but I don’t get to work with students more than a handful of times a year anymore, and so I can tell I have that combination of being both excited and nervous about being in a classroom … like the first day of school feeling. I’ll keep you updated.

Learning is messy!


I’m Building a 3D Printer – Day 2

A few days ago I posted about being part of a class for teachers and educators where we build a 3D printer and learn to use it and the keep it to use with our students and teachers.

Today we were given the entire 3-4 hours to just get back to work assembling our printers. The group all retrieved their boxed printers and got to it.

IMG_1862


BELOW: What I got done the 1st week:

IMG_1859


BELOW: Most of what still needs to be assembled.

IMG_1861


This printer is mostly made from wood. Wood that has been laser cut into parts … VERY precisely. The burning involved in laser cutting is betrayed by the black edges of the parts as you break them apart during assembly, as well as a hint of burning wood in the room and our somewhat blackened fingertips. Lots of screws and nuts, washers, gears and more are involved.

IMG_1864


We got to a certain point today and the next step meant we had to get the 5 electric motors required:

IMG_1865


As we assembled the frame, which involved installing the first motor, the shape of the printer emerged.

IMG_1867


When we ran out of time today we had a few more parts assembled and ready to add.

IMG_1869


By that point we had also installed the second motor.

IMG_1870


As pieces are snapped out of the laser cut wood lots of these little pieces fall out … are they all unnecessary? Or ??? Deciding keeps you on your toes.


That’s as far as we got today and it might be 2 weeks before I get a chance to work on it some more. We’re told it could be 20 hours of work when tweaking all the settings and getting software setup and all … after today we were about 7 hours in.

BELOW: The printer they assembled to check out the assembly process was busy today printing out gears for a transmission (note the image on the computer):

IMG_1873


Here’s a short video of the printer in action – click the link.

Link to 3D printer video

Learning is messy!

On The Road – Project Wet Training

logo

One of the valuable STEM learning opportunities I’m part of right now is training teachers across our state in Project Wet. Think of it as Project Wet with a STEM focus.

We wrote and received a rather large grant sponsored by the Nevada Division of Environmental Protection (NDEP). Its enough money that we will be conducting these trainings for about 2 years with the goal of training hundreds of educators statewide in water and other science content.

Myself (I’m the STEM Learning Facilitator for northwest Nevada), Lou Loftin who is the Science Learning Facilitator, and Mary Kay Wagner an Environmental Scientist in the Bureau of Water Quality Planning with NDEP, are a team that travels around providing 16 hour trainings statewide. Nevada is a huge state (from here in Reno to Las Vegas is over 400 miles one way) so we put many miles on Lou’s truck which we cram full of equipment and supplies when we go on the road.

DSCN0029


Currently we are in the middle of a 4 session class that convenes just south of here at River Fork Ranch in Genoa, Nevada.

IMG_1826


IMG_1827


We combine lessons right out of the Project Wet Guide 2.0 (which you cannot buy – you must participate in a least 6 hours of training in Project Wet to receive a guide) with hikes through the parks where our classes usually take place, some training in online photo archiving (Flickr), wikis and the online Project Wet Educator’s Portal.

IMG_1830


DSCN0144


Besides receiving a copy of the Project Wet guide, participants in our trainings also take supplies and resources provided by the grant back to their classrooms – beakers, pipettes, graduated cylinders, measuring tapes, Earth globes, maps and more. They also take back the links and online resources we help them register for (see above) and the network of teachers they meet and link to as part of the class. Several participating teachers have already brought their own students to the sites on field trips.

If you follow me on Twitter I often Tweet out photos and reports of where we are and what we’re up to. We have several more “Wet” classes coming up before June in eastern Nevada, and come fall we’ll continue our treks around the state. One of the “perks” of a project like this is getting to visit the beautiful places that abound in Nevada.

BELOW: Photos from our training in Las Vegas at the Clark County Wetlands where they pump 3 million gallons of water from the water treatment facility through the park daily to help provide habitat for a surprising amount of flora and fauna in the desert.

DSCN0041


DSCN0060

IMG_1749


DSCN0081


DSCN0055


DSCN0052


Learning is messy!

Building My Own 3D Printer

A few weeks back I was invited to participate in a class at the University of Nevada, Reno, where participants would build a 3D printer from a kit and learn how to use it. I jumped at the chance since you get to keep the printer, and I saw the possibilities to take it with me on the road as I travel throughout the rather large region I cover as STEM Learning Facilitator in northwest Nevada.

IMG_1842


The class is being taught by the same mechanical engineering folks that facilitate our high altitude balloon launches (see the TEDxDenverEd video in the right margin of this blog). My colleague Doug Taylor who taught with me for years when we collaborated on those launches and much more is taking the class with me and is building his own 3D printer.

I do not have much of a background in programming unless you count a bit of BASIC I learned 30 years ago or the LOGO I dabbled in with students, so I see this as stretching me a bit as well as providing another resource for the school districts I serve.

IMG_1843


After presenting us with some background on advanced manufacturing we were put into pairs since 2 printers came in each box, and put to work putting them together. The directions are YouTube videos and PDF files you are linked to –  which is a nice combination.

IMG_1844


You can see they crammed 2 printers in each box and there are numerous parts and many are very small. The tools are Allen wrenches, screwdrivers and pliers.

IMG_1845


ABOVE: Everything required to build 2 printers.

BELOW: A finished printer printing gears. This is the instructors’ practice printer – they figured they better go through the process of building one themselves. The printing material is blue plastic – reminds me of the line you use in a yard trimmer, but a bit thicker. You can see the blue spool of material in the upper left of the photo.

These are MakerFarm Prusa 8″ i3 3D Printers – about $600

IMG_1849


BELOW: Some of the parts I assembled our first day.

IMG_1847


IMG_1848


BELOW: And here is what I got done the first day after about 2-3 hours. Finished pieces are on top. Lots left to do. Next class is this Saturday. I’ll try to post our progress.

IMG_1850


Learning Is Messy!